Fascinator Cake – a Sophisticated Birthday Cake
Fascinator cake - a step by step tutorial on how to create this pretty cake, perfect for any birthday girl.
Print
Pin
Add to Collection
Servings:
Calories: 157kcal
Equipment
- Some metallic wires - blue and purple here, 4 - 8mm
- Blue and purple feathers
- Some coloured beads, we used about 7-8
- Some purple or blue dragées (those little balls)
- Tiny amount of edible glue
- Purple ribbon - enough for a 20cm (8") cake
Ingredients
You will need
- 1 x 20cm (8") Madeira Cake
- ½ portion Buttercream Icing
- 125 ml jam of your choice (raspberry/apricot,etc)
- 500 g light blue fondant icing (sugarpaste)
- Some pink food colouring optional
Instructions
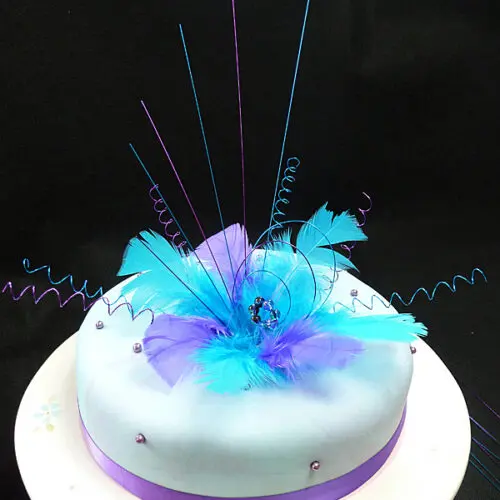
Wires and beads
- Take one wire, whichever colour, and string the beads through and twist the wire together to form a loop. Cut off the excess end, leaving about 3" to pierce the cake.
- Take 3 wires and form loops in increasing sizes, with the smallest being slightly bigger than the little beaded loop. See picture above to see what I mean. Again, trim ends as necessary.
- Take 6 wires, 3 of each colour, and twist them around a pencil, to get that twisty look, leaving about 3" free at the end to be inserted into the cake. See finished cake.
- The other 6 wires will be inserted in at various heights, as they are. See finished cake.
Feathers
- Number of feathers are up to you, we've used 4 blue and 3 purple here. Trim the bottom end of the feathers slightly but pushing the actual feathery bit into the cake is not a problem.
- Fill the cake with the buttercream icing and jam.
- Please read Icing and Filling Cakes with Buttercream .
Fondant Icing
- Please read How to Cover a Cake with Fondant
- You can leave the icing pale blue, as is, or knead some tiny bit of pink colour right at the end, to create streaks, which we've done here.
- Cover the cake as following the step by step tutorial on the "How to Cover a Cake with Fondant" page.
Decorating the Cake
- We've placed the decorations off centre, to the front, making the cake have an obvious front and back. You can follow suit, or go for a centrepiece effect.
- Place the ribbon around the base of the cake, securing with a touch of edible glue or even a bobby pin pushed into the cake. Just remember to take it out before serving!
- Insert the beaded loop in first, followed by the other 3 loops in ascending order, see picture
- Insert the feathers all around
- Next come the straight wires. Place them all in the cake in a slight arc. Then using a pair of scissors, snip the tops off, giving them a graduated look.
- The twisters come next, inserted at various points to complete the look, see tall picture below
- Finally, glue a small number of the dragées around the cake just to "fill up" the empty look.
Nutrition
Calories: 157kcal | Carbohydrates: 32g | Protein: 2g | Fat: 2g | Saturated Fat: 1g | Polyunsaturated Fat: 1g | Monounsaturated Fat: 1g | Cholesterol: 31mg | Sodium: 183mg | Potassium: 41mg | Fiber: 1g | Sugar: 22g | Vitamin A: 46IU | Vitamin C: 1mg | Calcium: 23mg | Iron: 1mg
Did you make this recipe?Mention @azlinbloor and tag #linsfood!
Made it? Upload your photosMention @azlinbloor and tag #linsfood!