
Recipe for Crespéou (Provençal omelette cake) – layered omelette cake.
Estimated reading time: 4 minutes
Table of contents

Vegetarians! It doesn’t get any better than this! An omelette cake you say? Yes, and filled with all manner of vegetables, then slathered with a herby cheese mix – sigh… or would that be drool?
The idea of an omelette might not seem sexy or luxurious to some but I tell you, that’s because you haven’t had crespéou yet! Ok, ok, I admit, I can’t got far without my beloved anchovies but mark my words, oh you disbeliever, anchovies or no anchovies, once eaten, never shy! So yes, my veritable vegetarian friends, this is for you, a feast of indubitable indulgence!
But fair warning,
A slice will not suffice
A little goes a long way!
For you, my riddle of the day!
I learnt to make this omelette in Provence, its home. For a couple of years in the 90s, I spent most weekends on the (European) Continent, my time was predominantly split amongst France, Italy and Spain. While my friends would go clothes shopping, I’d go food or recipe hunting. So, I first had this and then made it in the kitchen of one of my friends, in a not so little farmhouse on a whole lot of land, in Provence.
Crespéou is, as the translation suggests, an omelette “cake”. Layers of differently flavoured omelettes are piled on top of one another with an “icing” of seasoned cheese. It is a very forgiving and a very generous recipe, in that you can use nay vegetables you fancy to flavour the omelette and you can use any soft cheese and/or cream to fill between the layers. The first one I ever ate had red capsicum (bell pepper) in 3 layers and courgettes in another 3. This is still my favourite combination, of course, I do spice it up with other flavours. But I’ve also used artichokes, aubergines, celery, sundried tomatoes, mushrooms, pesto and many, many more. Go with the flow!
Tips
Most people like to precook the vegetables before adding to the omelette but I quite like the slight crunch of the vegetables, so I don’t.
I do however, like to use grilled or roast peppers for this, I love the depth they add. Click for recipe. You can just use fresh if you like.
Cheese Filling – needs to be a little soft, so you can spread it. I love boursin so that’s what I usually use, lightening it slightly with some fresh cream. You can use some soft cheese flavoured with herbs & spices of your choice – chives, garlic, parsley, chilli flakes, etc. As I’m using boursin, I don’t need additional flavours. Even some grated hard cheese would be lovely!
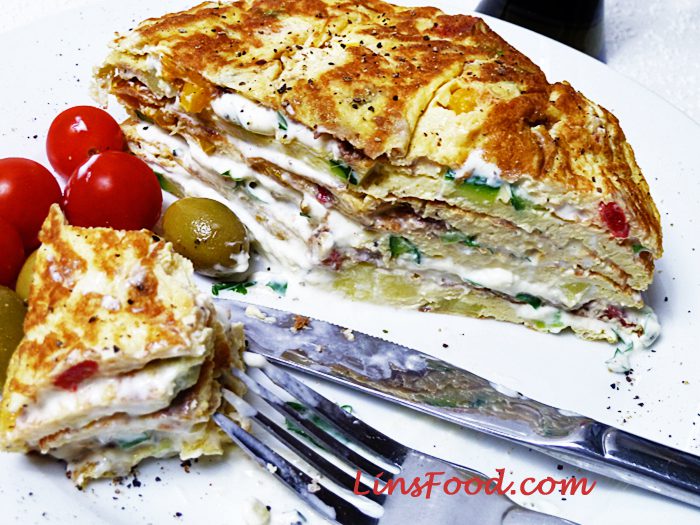
Quite often, crespéou is made the day before, then “built up in a cake tin lined with cling film. A plate is then placed over it & weighted down with a can of food. This compresses the whole ensemble, making it look more like a cake the next day and you are also able to cut it up neatly. However, that’s not to say that you can’t make it on the day & skip that stage. In the picture here, I made it at the last minute for some unexpected guests and didn’t bother with the final compressing stage, as you can see from the oozing cheese filling.
Best served with some salad; olives will go nicely too.
Shall we get our aprons on?
If you like the recipe, don’t forget to leave me a comment and that all important, 5-star rating! Thank you!
And if you make the recipe, share it on any platform and tag me @azlinbloor, and hashtag it #linsfood
Lin xx

Crespéou (Provençal omelette cake)
Ingredients
- olive oil as needed
- salt and pepper as needed
Courgette (Zucchini) layers
Red Pepper layers
Cheese Filling – mix this together
- 150 g boursin
- 1-2 Tbsp fresh cream
Instructions
- We are going to make a total of 6 omelettes, 3 of each, then pile them up. Get 2 large bowls and beat the eggs, 5 in each bowl.5 eggs, 5 eggs
- Add all the courgette layer ingredients in one and the red pepper layer's in the other.1 small courgette (zucchini), 1 clove garlic, 2 spring onions, 3 red peppers, about 4 slices of anchovies from a can, 1 dash chilli flakes
- Whisk to mix thoroughly, seasoning well, although bear the anchovies in mind, if using.salt and pepper as needed
- Heat a little oil, 1 tsp should suffice, in the pan over medium heat and pour about a third of the courgette layer in. Let set for about 10 seconds, then draw the omelette in from its sides, letting the liquid flow onto the pan, until it's almost dry. Flip over. Be careful, it's not as sturdy with all those vegetables in. Easiest way is to place a plate over it and flip over, then slide the omelette back in to cook the other side. See Spanish Tortilla.olive oil as needed
- Lift onto a plate and keep aside.
- Wipe the pan clean with a kitchen paper and repeat the process 2 more times with the courgette mix.
- Then wipe the pan clean and do exactly the same with the pepper mix, getting three pepper omelettes too.
- I suggest letting the omelettes cool down slightly before sandwiching as the heat will make the cheese filling all runny.
The Assembly
Serving immediately
- Lay the first layer (either courgette or red pepper) on your serving plate.
- Make the cheese filling by mixing the 2 ingredients together. Spread some of this filling all over.1-2 Tbsp fresh cream, 150 g boursin
- Follow this with a different layer, so if you started with a courgette layer, this one will be a pepper layer.
- Another spread of the cheese. Keep alternating the layers with a cheese spread/filling in between, until all the layers are used up, finishing with an omelette layer, not cheese filling.
- Cut up into slices and serve as suggested.
Serving the next day
- Double line an 8in pan with cling film, leaving enough overhang to completely cover the omelette.
- Do exactly as above with the layering.
- Cover completely with the overhanging cling film.
- Weigh down with a plate and food can and place in the fridge for a few hours until needed or overnight.


