
A step by step demonstration on how to make a Mermaid Cake for girls. Links for Madeira cake and Buttercream Icing too.
Estimated reading time: 3 minutes
Table of contents

Mermaid Cake
I can always rely on my girls to pick a fun cake for their birthdays, and this is no exception. It’s a cute and pretty cake, perfect for all little girls and boys who love mermaids and Ariel, in particular.
I’m going to give a step by step demonstration on how to achieve this beautiful mermaid cake. This is what we’ll be doing:
- Bake the cakes, I’m using this Madeira Cake recipe.
- We “make” the mermaid.
- Then we decorate the cake.
I promise you one thing, we’re going to have lots of fun!
We need 2 cakes, the bigger cake can be any size, depending on how many mouths you have to feed, an 8 or 9 inch cake, or even bigger. The second one need only be a small one, about 4 inches, to be the little “rock” that Little Miss Mermaid sits on.

Cake Decorating
Please go to the Cake Decorating Page for more recipe links. I like using Madeira Cake for most of my celebration cakes as its density makes it easier to handle and gives me more time as it lasts up to 2 weeks. Please click here for the Madeira Cake recipe and here for the Buttercream Icing. You will also find cake pan conversions on the Madeira Cake page.
Use a Real Doll for your Cake
I like to use real dolls for my celebration cakes, whether it’s this Mermaid Cake or a Doll Cake, for the simple reason that they are a whole lot prettier than those grotesque doll picks sold for the purpose, that remind me of Chuckie! If you strip the doll of her clothes, wrap her up in cling film, she stays pretty clean and any cakey or icing bits can be washed off easily after.
I’ve specified the types of icing and roughly how much you’ll need. What would also be handy are those little coloured icing tubes you can buy, just to add little details if you need to.

Essentially the order of things:
- “Make” the mermaid
- Ice the cakes, we’ll be doing this twice, the first or crumb coat, then the second/final coat
- Assembly
- Decorating and final touches
So, shall we get our aprons on?
If you like the recipe, don’t forget to leave me a comment and that all important, 5-star rating! Thank you!
And if you make the recipe, share it on any platform and tag me @azlinbloor.
Lin xx

Mermaid Cake
Equipment
- 1 x 4in cake card
- cake stand or board for the cake
- piping bags
- piping nozzles – small writing tip, a leaf tip
- offset spatula for icing, or regular
- a small knife
- a fork
- clingfilm
Ingredients
- 1 x 8in or 9in Madeira cake
- 1 x 4in Madeira cake
- 1½ portion buttercream icing
- small portions of coloured fondant (sugar paste) of your choice, e.g.: pink for the mermaid's tail, orange and red for sea creatures
- small shop bought coloured icing tubes
- raspberry or strawberry jam for filling the cakes
- food colouring (gels are always best) of your choice, e.g.: blue for the sea, green for grassy knoll the mermaid sits on, pink for piping flowers
- edible glue or a small bowl of water
- edible glitter optional
- a pretty doll, Barbies are perfect, medium size
- any other decorations you fancy, here, I've got: a small Lego treasure chest, small colourful beads for the chest, some tiny silk flowers
Instructions
Let's start with the mermaid
- Wrap her up, waist down, with cling film, and set aside.a pretty doll, Barbies are perfect, medium size

- Get a small amount of pink fondant for her tail. If you wish, add a tiny amount of red food colouring and knead in slightly for a variegated effect, leave it plain is fine too.small portions of coloured fondant (sugar paste), food colouring (gels are always best)
- Separate the fondant into 2 parts, one much larger, the smaller one for the end of the tail.
- Roll out the larger piece to about 4mm, sit the mermaid on to check for size. If you think it's long enough and wide enough to totally cover her from waist to ankles, cut off any unsightly and extra bits.
- Wrap the fondant around the mermaid, securing it with the edible glue or water behind her.edible glue or a small bowl of water

- Get a small writing nozzle and holding it at a 45˚ angle, press into the tail, creating crescents from the top to the end to mimic fish scales (see finished picture). Place her aside, on her side or front as you don't want her bottom sticking on the surface for now!
- Take the smaller fondant, roll and cut into a triangle that will match in size to the mermaid's tail. Elongate the ends slightly and pinch the top in, to make it look more like a mermaid's tail end and less like a triangle. Using the back of a knife, press down to create long lines to resemble a fish tail (see finished picture). Leave aside, we'll assemble the tail at the end.

Now the cakes
- Divide the icing up: two thirds into a large bowl, one third into a smaller one.
- Colour the large bowl blue for the sea, a mix of blue and green/turquoise works very well too. Set aside.
- Take a small amount of icing out of the smaller bowl, like half a cup's worth, mix in pink food colour and set aside. This tiny amount will be for the pink flowers you'll be piping on the grassy bit later.
- Colour the rest of the small bowl green for the grassy knoll the mermaid will be sitting on. Set aside.
- Decide what your cake is going to stand on and place the large cake on the cake stand.1 x 8in or 9in Madeira cake
- Cut up some regular paper or baking paper into 2in strips and slide them under the cake to protect the cake stand.
- Take the bigger cake, halve it and fill with jam and buttercream (the blue one that's been coloured for the sea) as you would a regular cake. Thin the icing down with 1 tsp milk or water if it doesn't glide easily.raspberry or strawberry jam for filling the cakes, 1½ portion buttercream icing

- Using an offset spatula, cover the large cake with the blue icing all over, to resemble the sea. Place in the fridge for about 30 minutes to set.
- In the meantime, take the small cake and carve it to resemble a rock/knoll that the mermaid is going to sit on. Make sure that the mermaid can sit comfortably on with her feet resting on the "water", the cake musn't be too high.1 x 4in Madeira cake
- Halve the little rock and fill it with the jam and icing too and place on the little cake card.
- Using the offset spatula, cover the little cake/rock with the green icing, place on the cake card and into the fridge to set for 30 minutes.
Little decorations
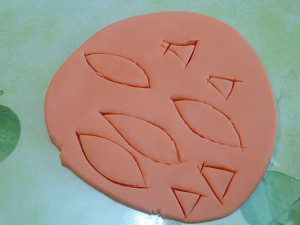
- While waiting, let's cut out some starfish and fish shapes with the various fondant. Use the tiny star cutters for the starfish and create little suckers using the small end of a small writing nozzle.
- Use a small knife to cut out fish shapes, see picture above. Create scales with a small writing nozzle like before. Use the coloured icing tubes to create eyes and fins.
Finish the cakes off
- Apply the second coat of icing on both cakes, blue on the large, green on the small.
- Using the tip of a small spatula or the small end of a spoon, create patterns on the larger cake, to resemble waves.
- Smooth the green cake's icing, it doesn't have to be totally smooth.

Assembling the mermaid cake
- Usually, you need to dowel cakes if you're going to stack them so the lower cake will be able to take the weight of the top cakes/s. However, as the top cake here is very small, we can get away with not doing that. Spread a little buttercream on the underside of the cake card and place it on the larger cake at one end, just pushing it down gently to fix.
- Spread a little buttercream on the mermaid's bottom and sit her on the grassy knoll comfortably.
- Attach the tail end to the rest of the tail, smoothing the two ends together, pressing the tail into the blue icing to fix in place.
- Take a fork and dip into the undiluted blue food gel. Starting at the base, take it up, wiggling slightly to create a deeper blue as in the pictures. Do this all round.

- Pipe out some grass/seaweed using a small leaf piping nozzle and green buttercream (the remainder from the little cake's green icing).
- Attach all the decorations that you are using all around the cake. I've even placed some little "gems" lying around.any other decorations you fancy, here, I've got: a small Lego treasure chest, small colourful beads for the chest, some tiny silk flowers, edible glitter
- Pipe some tiny flowers using a tiny star nozzle all around the mermaid's bottom, on the knoll.
- At the same time, pipe out a bikini top around Miss Mermaid, I like to do this last as there's less chance of it being messed up.
- Pipe out "Happy Birthday" as you see fit.small shop bought coloured icing tubes


Wow,
Your girl is so lucky to have a have a talented mommy like you. I am just so intrigued with fondant and icings. Never given it a try but your blog and post is certainly inspiring me to.
Your mermaid cake is adorable and beautiful. You’re truly talented. I wish I make my kids’s b-day cake 1/2 as pretty as yours. 😛 I”m sure the birthday girl was super happy to see this.
This is such a beautiful cake for your girls Lin! I am sure they loved it!
Great job Lin!! Love the mermaid and the rainbow cake! A double plus cos I adore Madeira cake!
Nazneen
So pretty this cake Lin…and I absolutely love the colorful cake…such a lovely surprise! I sure would love a slice of this cake.
Thanks for sharing such a beautiful post and hope you are having a lovely week 🙂
Happy birthday to your princess. That is a masterpiece you created! Very impressive work!
That is absolutely superb my friend, you have made it perfectly – what art 🙂
Cheers
CCU
That is one of beautiful mermaid cake, I came across, Glad to meet you through MJ Love this cake. Belated birthday wishes to your Princess
Oh wow Lin that’s so adorable and you have taken the time for all the work and details, very impressive. I am never that good in working with fondant and icing! Your little girl has the best mommy ever! =)
I am blown away with the cake and the mermaid deco on top. The sliced pieces is obvious with the contrast of color and salute to your daughters. They have to be since they have a mum is such a pro in baking.
I admired and loved it. But I don’t have the time and patience for such baking recipes therefore I shall stick with my Asian fusion recipes.