
Estimated reading time: 4 minutes
Covering a sponge cake with fondant need not be a stressful job, with a little bit of practice, you’ll be amazed at how good you get with it! All you need to cover a cake with fondant is to apply a thin layer of buttercream or jam that acts as a glue and also smooths out the cake.

A fruit cake is usually coated with apricot jam before being covered by marzipan, then a layer of fondant. As I don’t like marzipan, I usually just cover it with a layer of fondant over the jam.
Using rolled fondant/sugarpaste – see the fondant page for homemade recipe and more do’s and don’ts.
Always knead it, adding a little white vegetable fat, for a couple of minutes before each use to warm it and make it pliable. This will get rid of any “tightness” and ensure that your icing doesn’t crack as you lift it and cover the cake. The adding of the fat is, in my opinion, essential if you want to prevent cracks.
If you’re not sure on thickness, use spacers, 4 or 5 mm (about 1 eighth of an inch) is perfect. I know we all like less fondant on our cakes but a too thin fondant has a greater tendency to stretch as you lift and drape, resulting in tearing. Use a smoother and your hands to smooth out the paste but make sure that your hands are clean and dry to prevent marks on the paste. To fit the fondant, lift and place over the cake, not stretch which will result in tearing.
How much fondant do I need to cover a cake?
Round (about 3 in/7.5 cm high)
6″ – 4oo g (14 oz)
8″ – 500 g (18 oz)
10″ – 700 g (24 oz)
12″ – 1 kg (36 oz)
Square (about 3 in/7.5 cm high)
6″ – 600 g (22 oz)
8″ – 850 g (30 oz)
10″ – 1 kg (36 oz)
12″ – 1.4 kg (50 oz)
1 portion of buttercream is enough for 2 coats on an 8″ cake and some left over for piping top and bottom of cake. This is approximate as a lot depends on the consistency of the buttercream.


When you’ve covered your cake, you’ll be ready to decorate it or stack it, if you are doing a multi-tiered cake. Check out the Cake Decorating Page for how to stack and dowel cakes. And for some decorating ideas:


Now, shall we get our aprons on?
If you like the tutorial, don’t forget to leave me a comment and that all important, 5-star rating! Thank you!
Lin xx

Covering a cake with fondant
Equipment
- Offset spatula
- a smoother
- small sharp knife
- a large smooth plastic rolling pin
Ingredients
For the Decorating
- 500 g buttercream icing see above for how much you’ll need
- ½ tsp fresh milk or water
- 500 g fondant/sugarpaste icing see above for amount for your size of cake
- 1 tsp a little white vegetable fat solid
- 1 8"/20cm Madeira cake or cake of your choice
- cakeboard
Instructions
- Dilute the buttercream with about half-one tsp of milk or water and mix well. A lighter buttercream spreads better.
- Using your spatula, cover the cake completely with the buttercream. As this is the undercoat, we don't have to worry about making it pretty.
- Sprinkle your work surface with icing sugar and knead and roll out the fondant, to about 4mm thick.
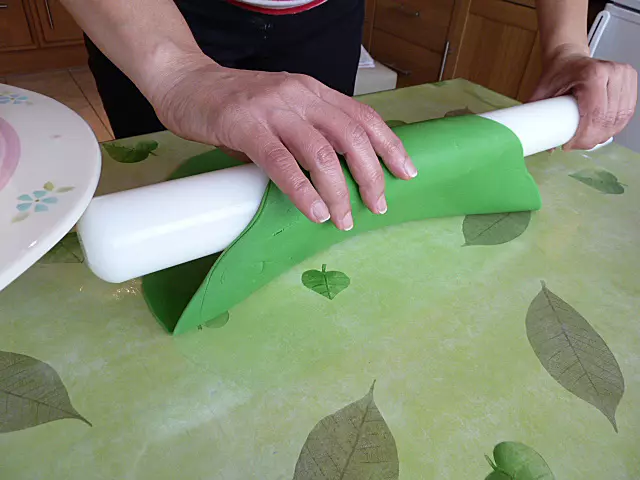
- Make sure your cake is very close by. Using your rolling pin,( i.e., roll about a quarter of the fondant onto the pin) lift the fondant and drape it gently onto your cake.
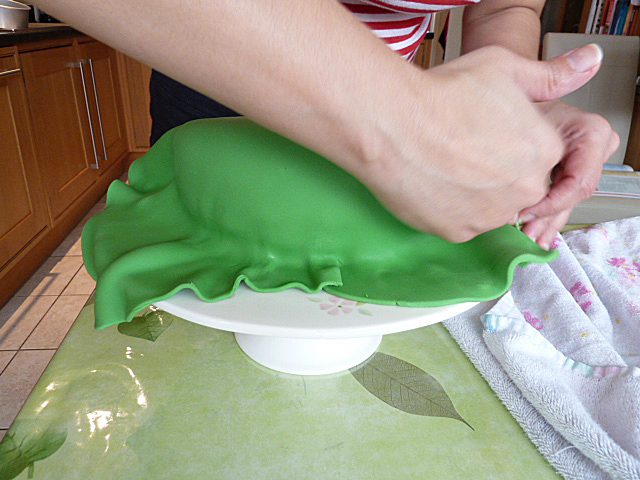
- Using your hands, fit the fondant on the cake, lifting and draping, not pulling. Using the the side of your hands, tuck the fondant at the base of the cake.
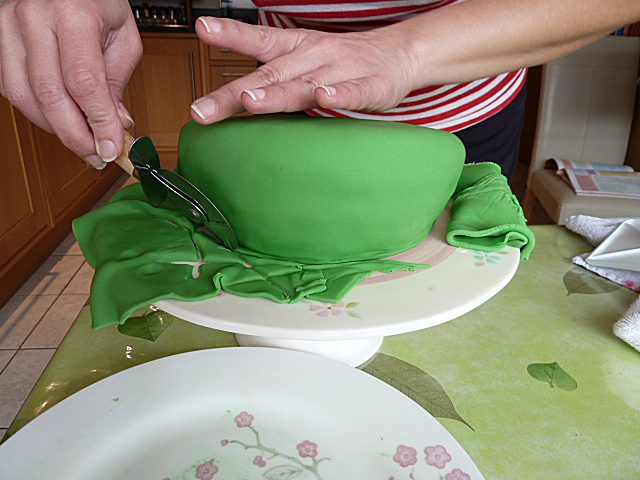
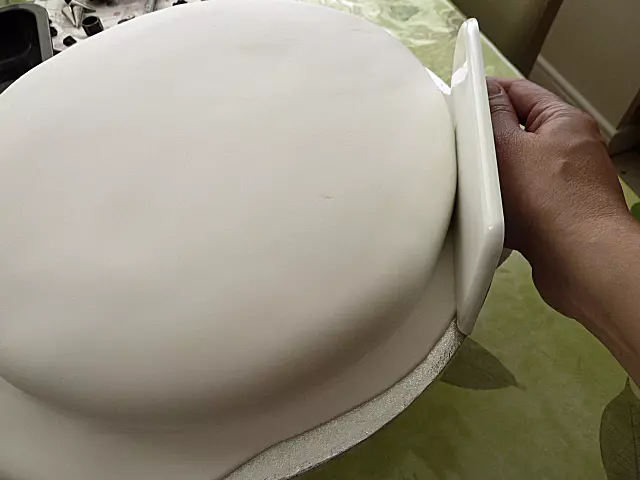
- Smooth the top with a smoother and press down around the base of the cake to mark a cutting line.
- Using a small knife, cut the excess fondant off. That’s it. Decorate as you fancy. Look below for the links to some of my cake creations.
I have to cover one each of No. 3 and No. 0 cakes with fondant icing. How much icing will I need please?
Hi there, without having a rough idea of the width/length/depth of your cakes, I’ll give you an estimate.
I’m going to go with cakes that are about 3″ deep, and roughly 9″ in length.
You’ll need at least 1.5 kg (3.3 lb) of fondant.
Thank you, Azlin. I presume that your estimate of 1.5 kg is for both cakes?
Yes, for both. And it’s my pleasure.
Hi Azlin, Do you have, or can recommend, a recipe for simple chocolate cake I can use for my number tins – 3 and 0. I have looked online but the recipes seem to vary so much. If you can help, please include baking temperature (without fan) and times. Thank you very much.
Hi Vera, I tend to use this chocolate cake recipe: Perfect Chocolate Birthday Cake
I can’t give you a converted recipe until I know your cake pan measurements.
If you have the time before you need the cake, fill your cake pans up with water individually, until they are about 2/3 full. Basically how much you will fill them with cake batter.
One at a time, pour this water into a measuring jug and write down the volume (fluid oz or ml, doesn’t matter). Keep the two volumes separate.
Reply here with those measurements, and I’ll adjust the chocolate cake recipe and times for you. I’ll be sure to check back so I can reply promptly.
Hello, I have picked up the pans but they have no bottom, so I can’t do the measuring you suggested. To be sure, I will make double the quantity for each tin and just bake any remaining mixture as an ordinary cake.
Thank you for all your help with this.
My pleasure. Good luck and have fun! Let me know how it goes.
Hi Azlin, I didn’t use your chocolate cake recipe for the number cakes but they turned out quite well, so pleased with that. However, I have just used your recipe to make an ordinary round birthday cake and it’s fantastic. Best chocolate cake I have made. Thank you very much.
Thanks for letting me know. It’s definitely our favourite chocolate cake as it strikes a great balance between sponge and density.
Yes! Finally something about Fondant Cake.
I’m glad you approve!
Do I need to chill the cake in the Refrigerator before putting Fondant Icing?
Hi Charity, no you don’t, as the buttercream acts as the glue, you want it “wet”. Once you place it in the fridge, it builds a crust quicker. We place it in the fridge only if we are covering it with a second coat of buttercream, then that crust is helpful, as it will be like a smooth board to paint over.
That’s pretty clear instructions.
Great help – and so clear – many thanks
Jules, thank you for popping in and leaving me a note about it – I appreciate it! x
so sweet…thanks for the clear instructions:)
Brilliant tutorial, I’m making a birthday cake soon and want it to be as special as possible. This is exactly what I needed, thank you for putting it up 🙂