
This homemade red chilli paste (cili boh) is the base ingredient that makes Southeast Asian cooking feel easy: blend, fry, stash in the fridge (or freezer), and suddenly weeknight sambal, stir-fries, marinades and noodles are five minutes away.
Estimated reading time: 12 minutes
Table of contents
- What is Red Chilli Paste (Cili Boh)?
- Homemade Red Chilli Paste
- Red Chilli Paste 1
- Chilli Paste 2
- Try it next (what I use each paste for)
- Homemade Chilli Paste Ingredients
- Variations on our Red Chilli Paste Recipe
- Troubleshooting
- How long will this Chilli Paste Keep?
- Red Chilli Paste FAQs
- Images by LinsFoodies

What is Red Chilli Paste (Cili Boh)?
In Indonesia, the go-to red chilli paste for cooking would be sambal oelek. But in Singapore and Malaysia, we use cili boh.
Cili boh is a simple, all-purpose red chilli paste used across Singaporean and Malaysian cooking (and it shows up in the cooking of the region too, under different names). Think of it as a building block rather than a finished condiment: you cook it into dishes to create that deep, fragrant chilli flavour, not just heat.
Not unike another Indonesian chilli paste – sambal balado (on SMR, my other blog).
It’s worth saying out loud: chilli paste isn’t the same thing as chilli sauce. Chilli paste is thicker and more concentrated; sauces usually have more liquid (often vinegar/water/sugar) and are meant to be used more like a pourable condiment.
The most basic cili boh contains only fresh or dried red chillies, salt and the oil it’s fried in. In fact, fresh chilli boh sold in wet markets is usually just the red chillies ground to a paste with a grinding stone, what we call batu giling. It’s not fried at all. Just like sambal oelek.
This freshly ground cili boh is the one we always used when I was growing up in Singapore; bought from the wet market in Holland Drive.
Language Segue:
- batu = stone (pronounced ba – tu)
- giling = roll (gee – layng)
- cili = chilli pepper, the way it’s spelt in Malay
When my grandma made it at home, she’d add onion, garlic, sugar and sometimes candlenuts. This produces a richer and more aromatic cili boh than the basic one. And that’s the version I’m giving you here.

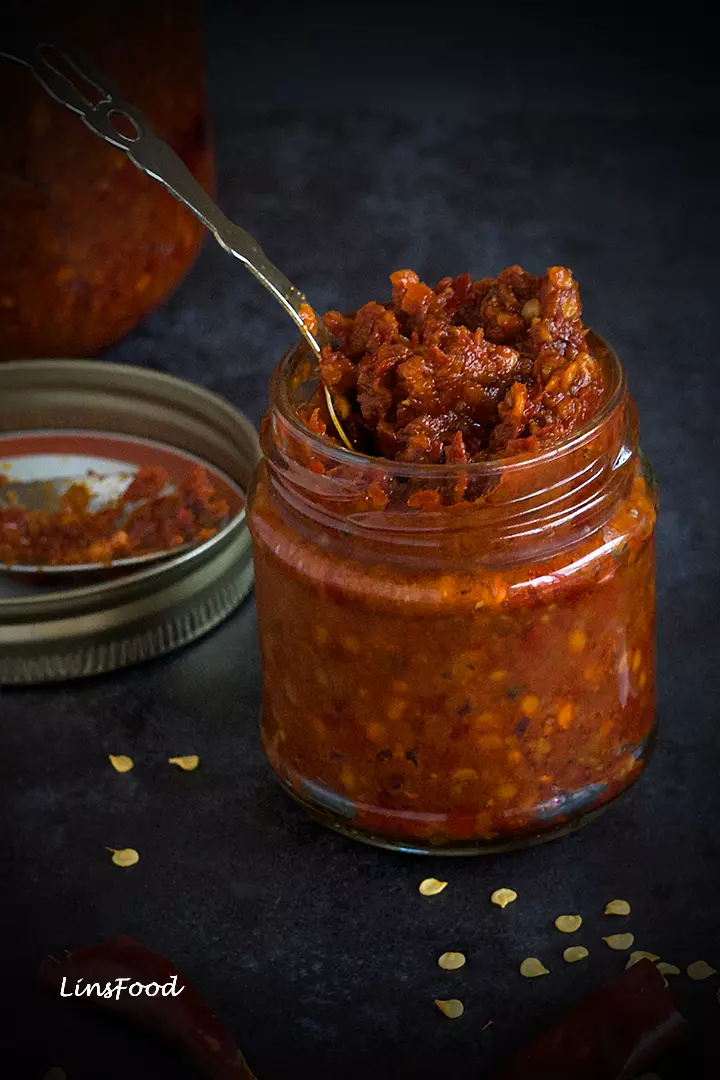
Homemade Red Chilli Paste
Over the years, I’ve had so many thank you notes from readers for this recipe – because, let’s face it, we can’t always get the real thing where we live. So we make our own.
The advantage of making your own:
- Control the heat and flavour
Different dried chillies give different results (some bright and fruity, some earthy, some vaguely smoky). Make it yourself and you choose the profile – and you can make it milder or hotter instead of being bullied by whatever’s in the jar. - Better aroma (especially once fried)
Raw blended chilli is sharp. Fried chilli paste is rounded, deeper, and smells like real cooking. That frying step is what turns a blender paste into something actually worth keeping in the fridge. - It’s a time-saver that doesn’t taste like a shortcut
Once you’ve got cili boh ready, a lot of classic dishes become: fry onions/garlic, add a spoon of paste, cook. Not: start from scratch every single time.
Two versions: quick vs long and slow
You’ll see two approaches in my recipe card:
Chilli Paste 1 (quick fry)
This is the fast one: blend and fry briefly. Ideal when you want a fresh, punchy chilli base and you’ll use it up quickly.
Chilli Paste 2 (long cook)
This one is all about depth. Long, slow frying reduces moisture, tames harshness, and builds a darker, richer paste. This is the version that makes people ask what your “secret ingredient” is – and the secret is simply: you cooked it properly.
Both have a place. If you cook Southeast Asian food regularly, you’ll end up making whichever version matches your mood and schedule.
When I first wrote this recipe back in 2013, I gave you the long-and-slow paste, because that’s how I’ve always made it. But over the years I’ve had so many requests for a quicker paste (and one using fresh chillies) that now…
You get two recipes for the price of one: a quick version, and a low-and-slow.
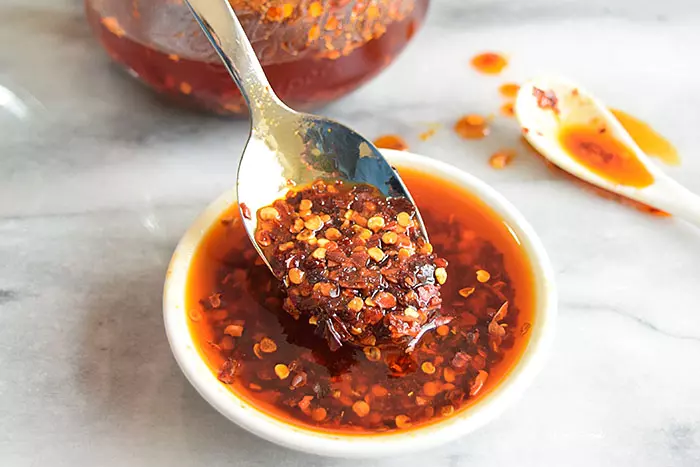
Red Chilli Paste 1
This is the speedy one – cooked for the briefest of times, using dried or fresh chillies. The result is lighter in flavour and aroma, retaining much of the freshness of the chillies, garlic and onion, with a hint of sweetness from the onion.
This quick red chilli paste is best used as a cooking ingredient, as it retains more of the raw taste of the ingredients (especially the chillies, onions and garlic).
If you want, you could make a basic cili boh here: just use the chillies, salt and oil.
Best used for:
- Quick stir-fries and “weekday cooking” where the chilli paste is just one ingredient, not the whole personality of the dish
- Noodle tosses and light sauces where you want a brighter chilli hit
- Marinades (mix with soy/fish sauce + something sour) when you want punch without waiting around for a long tumis
Not ideal for:
- Recipes where the chilli base needs to taste deeply cooked and aromatic (that’s Paste 2’s job)
Chilli Paste 2
This is indispensable in my kitchen. The key to this second homemade chilli paste is the frying of the paste. In Malay, we call this tumis – and the longer the tumis time, the deeper the aroma and flavour, and the darker the colour.
For this second version, you want to cook for a minimum of 1 hour. I like an hour and a half to two, if I have the time.
You can use either fresh red chillies or dried ones. Dried chillies will always give a deeper aroma and flavour. But because we’re cooking for a long time here, the gap narrows.
In the long-cooking one, the pot you use makes a difference to how dry your paste will be. In a wok (wider surface area), your chilli paste will dry up quicker and will most likely need more water.
Best used for:
- Sambal-style bases where the chilli paste is the backbone (this is the one that makes the kitchen smell like you know what you’re doing)
- Dishes that want depth and richness: fried rice bases, slow stir-fries, anything you’d normally start by tumis-ing onions/garlic/chilli until fragrant
- Batch cooking: cook once, freeze portions, and suddenly “I can’t be bothered” dinners still taste fantastic
Not ideal for:
- When you need chilli paste now and can’t commit to the long cook (Paste 1 exists for exactly that)
TL;DR: Use Chilli Paste 1 when you need it fast; use Chilli Paste 2 when you want maximum depth.
Try it next (what I use each paste for)
Paste 2: long-cooked (tumis) chilli paste
Mee Goreng Mamak
Use Paste 2 here for that deeper, darker, properly “mamak-stall” flavour. It’s the backbone of the dish, so you want the paste to bring aroma, not just heat.
Quick swap note:
If your mee goreng recipe starts with frying onions/garlic/chillies, treat Paste 2 as the chilli component and fry it with the aromatics until fragrant before adding the rest.
Ayam Masak Merah
Paste 2 is made for this. Ayam masak merah is all about that rich, tumis-ed chilli base – deep aroma, darker colour, and a sauce that tastes like it’s been loved for a while.
Paste 1: quick chilli paste
Spicy Corned Beef Hash
Paste 1 is ideal because it keeps the chilli flavour punchy and fresh, and it won’t overpower the beef.
Replace the chillies in your recipe with:
Start with 1 Tbsp Paste 1 (hash doesn’t need loads), cook it off for 30-60 seconds, then adjust at the end. If you want more heat, add another teaspoon at a time.
Remember: Paste 2 is concentrated and deeply cooked. Paste 1 is brighter and lighter. Don’t swap them 1:1 without tasting – unless you enjoy being surprised by your own cooking.

Homemade Chilli Paste Ingredients
Dried red chillies
Dried chillies usually give you more depth than fresh, and they’re the classic choice for cili boh. If you’re sensitive to heat, choose larger, milder dried chillies and shake out more seeds after soaking.
Fresh red chillies
Fresh chillies work, especially for a brighter taste. The paste will be less deep and can be more “raw” in flavour unless you fry it properly.
Onion and garlic
These aren’t optional in the “taste” sense. They’re what turns “chilli paste” into “the base of a hundred good meals”. For a straight up just-chillies cili boh, head on over to SMR.
Candlenuts (optional)
Candlenuts (or macadamias/cashews in small quantity) add body and a subtle richness. Some traditional recipes use them; many don’t. If you skip them, your paste will still be excellent, just a little leaner.
Oil, salt, sugar
Oil carries flavour and helps the paste fry properly. Salt is obvious. Sugar doesn’t make it sweet; it rounds the edge (especially if you’re using quite assertive dried chillies).
Variations on our Red Chilli Paste Recipe
You could add even more flavour to this homemade chilli paste by adding any of the following:
- Tomatoes
- Dried Shrimp
- Shrimp paste
TIP: A chopper, blender or food processor is a must for this as all the ingredients are processed together, then fried.
Troubleshooting
My paste is bitter
You likely scorched it. Lower the heat and stir more frequently, especially toward the end when it thickens.
My paste is watery
Either the chillies weren’t drained well or you added too much blending liquid. Fry longer to reduce, or use a wider pan/wok to evaporate faster.
It’s not red, it’s dark brown
Long cooking will darken it (that can be a good thing). If it tastes burnt, that’s heat management. If it tastes rich and deep, congratulations: you’ve done the long cook properly.
It’s too spicy
Use fewer hot dried chillies (or swap some for larger mild ones), remove more seeds, and lean on serving strategy: our chilli paste is the base, so the final dish can be balanced with sweet/sour/umami.
How long will this Chilli Paste Keep?
Fridge
Store in a clean jar, always use a clean spoon, and keep it cold, and it will last a week. If you want to stretch fridge life, a thin layer of oil on top helps reduce exposure to air and slows spoilage.
Freezer
Freezing is the best “always ready” option. Freeze in small portions (ice cube trays are perfect), then pop the cubes into a labelled bag so you can grab exactly what you need. Many chilli paste guides recommend freezing for longer storage rather than trying to keep a big jar going for ages.
Food safety note
This is a low-acid paste unless you add acid (lime/vinegar). Treat it like a fresh cooked ingredient: clean jar, clean utensils, fridge promptly, freeze if you’ve made a big batch. Refrigeration significantly extends the life of chilli pastes compared to room temperature storage.
I freeze them both in large ice cube trays and use them accordingly.
Once the chilli sauce is made, it’s important to save and label it so it’s easier to distinguish and use in the future. I love customising my own labels and patterns for custom die-cut stickers to stick on paste and sauce bottles.
Because guess what? It makes the perfect gift for a foodie friend.
The guys below are whom I use.

Red Chilli Paste FAQs
Cili boh is a Southeast Asian red chilli paste used as a cooking base in Singaporean and Malaysian recipes. It’s typically made by blending dried or fresh red chillies. My version here has aromatics (like onion and garlic), and is then fried to deepen flavour before storing for later use.
No. Chilli paste is thicker and more concentrated, usually with less liquid. Chilli sauce is typically looser and may contain added water or vinegar (and sometimes sugar) so it can be poured or used like a table condiment.
It depends on hygiene, ingredients, and storage, but refrigeration extends shelf life significantly to at least a week. Store chilli paste in a clean jar, use a clean spoon every time, and refrigerate promptly. Top with a layer of oil, and it’ll keep for 2 weeks. For longer storage, freeze in small portions.
Yes. Freezing is one of the best ways to store cili boh because you can portion it (ice cube trays work well) and use only what you need. Many recipes recommend freezing for longer storage rather than keeping a large jar going for weeks.
If you want depth, yes. Frying cooks out raw harshness, intensifies aroma, and gives you the richer flavour people associate with Southeast Asian chilli bases and sambal-style cooking.
Use it as a base for sambal-style sauces, stir-fries, fried rice, noodle dishes, marinades, and soups. It’s a flexible cooking ingredient rather than a “finished” sauce – one spoonful can flavour an entire dish.
Images by LinsFoodies
Have you shared yours with me yet?


If you cook Southeast Asian food even semi-regularly, this is one of those “make once, thank yourself all week” basics. Keep a jar in the fridge for quick dinners, stash cubes in the freezer for future-you, and pick your paste depending on what you’re cooking: bright and speedy, or low-and-slow tumis for maximum aroma.
And if you grew up with batu giling from the wet market too, you’ll know exactly why this one matters.
Lin xx

Red Chilli Paste Recipe – a very handy basic recipe
Ingredients
- 100 g dried red chillies, non smoky OR 450g (1 lb) fresh red chillies
- 1 large onion
- 10 cloves garlic
- 5 candlenuts, optional (or 5 macadamia nuts or 3 cashew nuts)
- water as needed
- 1 tsp palm or white sugar
- 1 tsp salt
- 125 ml vegetable oil for frying ¼ cup for the quick chilli paste
Instructions
Chilli Paste 1 (5 minutes)
If you are using fresh chillies, go straight to step 3.
- Put half a kettle on and then start by cutting the red chillies in 2-3 pieces with a pair of kitchen scissors, depending on the size of the chillies.100 g dried red chillies, non smoky OR
- Pour your just off the boil water onto the cut chillies, cover, and soak for 20 minutes.At the end of 20 minutes, drain the chillies, giving them a quick rinse and shake to lose the seeds, if you like.You could also save the soaking liquid to use to blend the chilli paste, but I prefer to use fresh water.
- Place the chillies, onion and garlic in a chopper and add enough water to allow you to blend to a paste.As you'll be frying the paste in oil, you don't want it to be too runny.1 large onion, 10 cloves garlic, water
- Heat only about 60ml (¼ cup) oil in a deep wok or saucepan, then add the ground ingredients, the salt and the sugar. Fry on medium heat for 5 minutes, uncovered, stirring occasionally. It's done.1 tsp salt, 125 ml vegetable oil for frying, 1 tsp palm or white sugar
- Let cool, then store for up to 2 weeks in the fridge.
Chilli Paste 2 (1 hour 3 minutes)
If you are using fresh chillies, go straight to step 3.
- Put half a kettle on with about 500 ml (2 cups) water and then start by cutting the red chillies in 2-3 pieces with a pair of kitchen scissors, depending on the size of the chillies.100 g dried red chillies, non smoky OR
- Pour your just off the boil water onto the cut chillies, cover, and soak for 20 minutes.At the end of 20 minutes, drain the chillies, giving them a quick rinse and shake to lose the seeds, if you like.You could also save the soaking liquid to use to blend the chilli paste, but I prefer to use fresh water.
- In the meantime, peel and quarter the onions, and peel the garlic.1 large onion, 10 cloves garlic
- Drain the chillies and place everything apart from the oil, in a blender. Add enough water to allow you to blend to a paste.As you'll be frying the paste in oil, you don't want it to be too runny.However, the long and slow cooking means that you may have to add a splash of water towards the end if it gets too dry.water, 1 tsp palm or white sugar, 1 tsp salt
- Heat the oil in a deep wok or saucepan, then fry the chilli paste on medium heat initially for about 3 minutes until fragrant.125 ml vegetable oil for frying
- Lower the heat and cook for an hour, uncovered, stirring every 15 minutes or so. In the last 15 minutes, you might have to stir a couple of times more, as the chilli paste starts to dry up.If it starts getting too dry and is catching (burning) at the bottom, add a splash of water (about 60 ml / ¼ cup) to allow you to keep cooking the paste for the full hour. Use less if you only have 10 minutes or so to go.
- Let your cooked red chilli paste cool to room temperature and store in a clean jar in the fridge; it will last up to 2 weeks in the fridge. You can even freeze until needed, in ice cube trays would be perfect, as you can use a little at a time as needed.
Use this red chilli paste to make Sambal Hae Bee on my other blog, Singaporean and Malaysian Recipes.

Notes
If you cook your chilli paste in a wok, as I sometimes do, you’ll probably need more water, given the wide, shallower and open nature of your wok.


Wow! This is fiery 🙂 I used mixed chillies because they are cheaper to buy like that, but in future I might buy some of the jalapenos, which tend to be a bit less hot. It’ll be used in a stew with cheddar cheese dumplings that I’m making later. Many thanks for the very clear and simple recipe, and for the little language lesson!
Hi Yama, it’s my absolute pleasure! Yes, how spicy your chillies are will determine the final heat level.
The stew sounds amazing!
This is such an awesome recipe. I made the dried chili version with arbol and it can be put on every thing. Like all chili recipes the longer it sits the more mild it gets.
I was so happy to find this recipe as I have a vinegar allergy, but how do you avoid the pepper fumes when cooking? People mentioned using very spicy peppers and I am wondering if it is an issue.
I also have a nut (and seed) allergy. Is there something I could try substituting for the candlenuts?
Thanks for your help!
Hi Reva, you can leave out the candlenuts completely. I make so many sambals like this one and don’t use the candlenuts. The long cooking time plays the biggest part in the flavour of this red chilli paste.
As far as the pepper fumes are concerned, the hotter the chillies, the more pungent the fumes to a certain extent. So if you use milder chillies, it will be slightly less potent.
One thing you can do is to put a lid on, leaving it just slightly off the edges to allow steam to pass. This will cut down on the strong fumes. The chilli paste will take longer to dry out though.
I hope that helps. Let me know if you have any other questions.
Hi Azlin
Thanks a million for the¡is recipe . I made it last year and gave little pots of it as presents. EVERYone loved it. I will be doing it again this year. Thanks so much. I used to live in Singpore and it reminds me of there. Thanks again
Cheers
Edward
My pleasure, Edward. I’m pleased you, and everyone else love it it! Definitely a staple in my kitchen.
So glad I found your site. Will make these pastes tomorrow thank you so much. very interesting information and detail. Including the questions. Just one query from me: for the long cook can I speed it up with the microwave without spoiling the flavour?
Hi Vi, yes, it can be made in the microwave oven, shouldn’t affect the taste. I’d start on the stove though, with the initial frying of the paste in oil. Do this for 10 minutes, then transfer to a microwave safe dish, cover and cook away. I’ve not done this before, but maybe 15-20 minutes? Just a guess. Be sure to stir at least a couple of times while cooking. And might want to hold your breath when you lift the lid, it’ll be spicy on the nose.
Let me know how it goes, I’m curious.
Hi there!
Thank you very much for the recipe, I had a lot of fun making it!
Anyway, I might have underestimated the heat of my chili (I think they are called scorpion something, but I don’t really remember) and now the paste is so hot that it’s basically impossible for me to eat.
Are there some tricks to decrease the effect of capsaicin? I read about using sugar or lemon juice, would adding them to the paste help somehow?
Hi Alice, scorpions are crazy hot!
We are going to have to change the chilli paste somewhat to reduce the heat level. How much you use of the added ingredients below will depend on how much of the chili paste you made.
If you have about 2 cups worth (500ml), you’ll need:
1. sugar – about 2 Tbsp
2. chopped tomatoes – 1 can (14oz/400g)
3. lime or lemon juice – however much you fancy, start with 1 Tbsp
Pour the chopped tomatoes in a saucepan and bring to a simmer.
Add the sugar and cook for 10 minutes, covered until it’s a little dry. You could use a potatoes masher to mash the chopped toms for a smoother feel. Or puree it with a blender.
Add the lime or lemon juice and taste. Add a little salt to ensure that it’s not bland.
Now you are ready to mix the above into your chilli paste.
You could add 1 Tbsp at a time or just use the whole thing.
This will make your chilli paste less spicy, but it will still be hot because you’re using scorpions, one of the hottest chillies in the world.
You could add more sugar if you think it’s not too sweet, but not too much.
The bonus here is that your chilli paste has a high level of acid, making it perfect for a water bath and storing.
I really hope this helps.
Hi Azlin,
Thank you loads, it was very kind of you to explain the procedure step by step!
I tried an worked out just fine 🙂 it is still very hot but way more manageable than before!
Now I’ll remember the scorpions forever lol
With love,
Alice
Haha, yes you will! And it’s my absolute pleasure. xx
Hi!
This looks delicious, if I can this by Water bath method and increase the acid level by adding vinegar, what is the shelf life of this then. Also can the garlic be increased slightly more?
Hi Tanu, if you increase the acid level and give it a water bath, it will keep for a whole year if left unopened. Once opened, store in the fridge and use within a month.
And yes, you can definitely increase the garlic, especially if you are going for the longer cooking time, as the garlic flavour will have time to come together with everything else.