
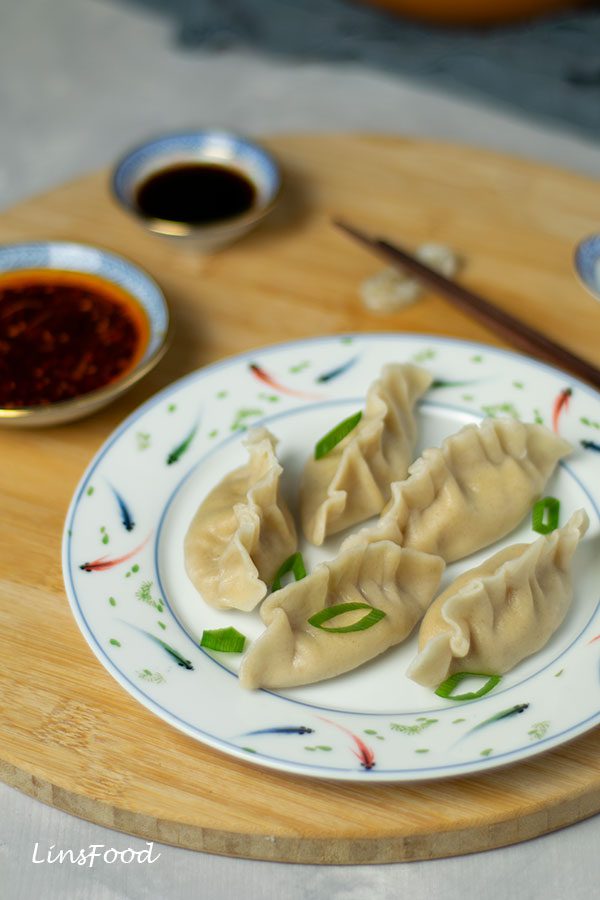
These homemade Chinese dumplings are perfect however you want to cook them – boil, pan fry or steam.
Estimated reading time: 10 minutes

Dumplings and the Chinese New Year
I don’t know anyone who isn’t a fan of Chinese dumplings, whatever the filling, however they’re cooked.
In wheat growing Northern China (as opposed to rice in the south), boiled dumplings are a very traditional offering on Chinese New Year’s eve.
As mentioned on the Lunar New Year recipes page, many of the food and practices related to this celebration are heavy on symbolism. The food, the decorations, the greetings are all about good luck, wealth, success, prosperity and long life.
While dumplings come in all shapes, the most common during these festivities is the crescent shape or the half moon shape, as it resembles yuán bǎo, the ancient Chinese gold and silver ingots. So by preparing and eating them, you are wishing on and imparting lots of wealth.
Chinese Dumplings
There are many different types of dumplings, once you start looking. For our purposes, we’re going to focus on the Chinese dumpling known as jiaozi. Let’s take a look at the 3 most common ones.
Boiled Dumplings (Shuǐ Jiǎo)
These are the most common type of jiaozi eaten in China. You’ll find them everywhere, sold as snacks and in restaurants. The name, literally means water dumpling (shui = water, jiao = dumpling).
Steamed Dumplings (Zhēng Jiǎo)
The word zheng means steam, and these are the ones you’ll see in bamboo steamers cooking away.
Potstickers (Guōtiē)
For many folks in the West, when they think of dumplings, this is what they have in mind. There is something so irresistible about a dumpling with a crispy, charred bottom!
Potstickers are also popular in Japan, where they’re known as gyoza.
In today’s article, we’ll take a look at how to make our dumplings from scratch, then how to cook them the 3 different ways mentioned above.

Dumplings from Scratch
This is what we’ll be doing:
- Make the dumpling dough.
- Make the filling.
- Fill and shape the dumplings.
- Cook the dumplings.
What do you think? Up to the challenge?
If you want to skip step 1 and use shop bought dumpling wrappers, by all means. But I’ll tell you now that the quality is never quite up to par. Shop bought dumpling and wonton wrappers tend to be on the dry side with brittle edges. Especially the frozen variety.
You’ll spend half the time moistening the edges to seal them. Homemade wrappers are so easy to make, you’ll be surprised.
Ingredients
Let’s take a quick look at what we need to make the actual dumplings and the dipping sauce we serve them with.
So there are 3 parts to it: the dough, the dumpling filling and the dipping sauce.
Chinese Dumpling Dough
Doughs don’t get any easier than this. You need only 2 ingredients. 3, if like me, you want to add a tiny pinch of salt to it.
Our homemade Chinese dumplings need:
- all purpose flour
- water
- pinch of salt (optional)
There are other ways to make dumpling dough that result in wrappers of a different texture. You can use warm or hot water, or even cornflour to make your dough. But that’s a topic for another day.
Resting your Dough
Chinese dumpling dough is pretty easy in effort and time. We give it 2 short rests.
The first resting time is only 10 minutes after the mixing of the flour and water. This quick rest is to allow the gluten to relax a little, so you can give the dough a quick knead later. It makes the job easier. At this stage, our dough is rough looking.

The second resting time is 30 minutes, or 1 hour if you have the time. I usually go off and make the filling at this time. Sometimes it takes me 30 minutes, sometimes 45. This second resting allows the dough to relax to allow us to roll and cut out the wrappers. Now, we have a smooth looking dough.

The Filling
There are no rules to what you stuff your dumplings with. Anything works here. You can use pork, chicken, beef, lamb, prawns (shrimp), or keep it vegetarian with tofu and vegetables.
You can also combine 2 proteins, which is a very common practice. So pork and prawns or chicken and prawns, that kind of thing.
Then all you need to ensure is that you have some sort of flavouring, because that dough is pretty plain. It’s the filling and the dipping sauce that make the dumpling experience.
For today’s recipe, we’ve got:
- boneless chicken thighs (or ready minced chicken)
- Napa cabbage or pak choi
- shiitake
- spring onion (scallion)
- ginger
- Chinese 5 spice powder
- light soy sauce
- Shaoxing rice wine (or a little clear vinegar)
- toasted sesame oil
- salt
You can see that in terms of filling, it’s just the chicken, cabbage and shiitake. Everything else is flavouring. So if you want to come up with your own filling, you can chop and change accordingly.

Dipping Sauce
Like the filling, dumpling dipping sauces are also very, very flexible in make up. Whatever you use, you are aiming for 3 flavours: salty, tangy and spicy (this last is negotiable).
So honestly, you don’t really need a dipping sauce recipe, a drizzle of this, a glug of that, and you’re good to go. The most basic dumpling dipping sauce and one of the most satisfying is just chilli oil plus Chinkiang vinegar (Chinese black vinegar). Click to read more.
I’ve given a very simple, basic dipping sauce in the recipe card below that contains:
- light soy sauce
- Chinese black vinegar (or regular clear vinegar)
- chilli oil (aka chili crisp)
Other Suitable Dipping Sauce
I have so many chilli based recipes here on LinsFood that will go perfectly well as dipping sauces for our dumplings. Like the following:


Other ingredients that are commonly used in dipping sauces for Chinese dumplings (but not all at once!):
- ginger
- garlic
- spring onions (scallions)
- fresh coriander leaves (cilantro)
- chives
- dill
- dried shrimp
- sesame seeds
I sometimes also like to use fish sauce, lime juice, shredded lime leaves or minced lemongrass to the dipping sauce and/or the filling. I’m South East Asian by birth, I can’t help myself!

Why Stir Dumpling Filling in One Direction?
It may sound like an old housewife’s tale, but there is science behind this method. It’s all about the salt, proteins and structure.
Assuming you’re using some kind of meat or seafood, once you’ve mixed all the filling ingredients together, stir everything together in one direction. If I’m making a big batch, I like to use my hand to do this, or even a food processor.
If making a small amount, a wooden spoon or chopsticks work best.
The Science: by stirring your dumpling filling in one direction, you are activating the salt soluble proteins, myosin and actin. These long chain molecules end up creating strings that bind each other, resulting in a gel like texture. Going in the opposite direction is going to break these strings up, giving you a loose filling that falls apart.
This is also why I like to mince the meat myself, giving a finer grain and also a head start to the gelatinous texture we want. Like in Kashmiri meatballs and the Indonesian bakso.

Folding the Dumplings
It’s my very first Chinese dumpling recipe on LinsFood, so I’m keeping it simple. I’m showing you 2 very easy folds to get you started. I published a YouTube short with a clip on it to help you get a visual idea.
We’ll address more complicated folds down the road. Incidentally, if you’re boiling the dumplings, keep the fold simple, because boiled dumplings don’t retain their shape as well as the other two.
These are the simple folds we’ll be doing:


How to Store Chinese Dumplings
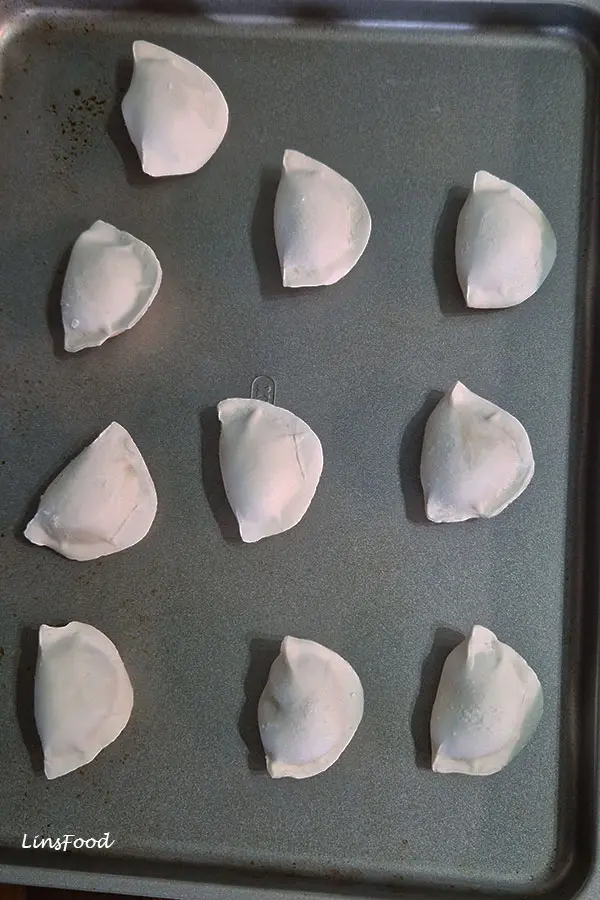
When I make dumplings at home, I always make a big batch. Like homemade Chinese fishballs and meatballs, frozen dumplings are so, so handy to have at home.
This is how to properly freeze them:
- Place them in a single layer on a baking sheet. Make sure they’re not touching each other. Open freeze them for 2 hours.
- Take the tray out and dump them into a freezer proof bag. Expel as much air as possible, then freeze for up to 3 months.
You can also freeze the dough itself for up to 3 months. Thaw for about an hour at room temperature before using, depending on the size of your ball of dough.
Leftover dumpling dough can also be shaped into wrappers, then frozen. You could open freeze in a single layer, then place in a freezer proof bag. Or make a pile of wrappers, each separated by a sheet of baking paper. Then place in a bag and freeze. Also for up to 3 months.
Cooking Frozen Dumplings
There’s no need to thaw your frozen dumplings. Just cook them the same way. Potstickers and steamed dumplings will need an additional 5 minutes than what’s in the recipe card below. Boiled dumplings just need 2 additional minutes, as they’ll take longer to float up, giving them the extra time they need.
And I think that about covers it. Shall we get our aprons on?
If you enjoy the recipe, drop me a comment and let me know. And if you are feeling like a star, don’t forget that 5-star rating! 😉 Xièxiè
If you make this recipe, post it on Instagram and tag me @azlinbloor and hashtag it #linsfood.
Lin xx
More Chinese Recipes


Chinese Dumplings Recipe from Scratch

Ingredients
- 250 g all purpose flour
- 125 ml water
- 1 generous pinch fine salt this is less than ⅛ of a tsp
- flour for dusting
Chicken Filling
- 200 g boneless chicken thigh or minced chicken
- 60 g Napa cabbage or pak choi
- 60 g shiitake
- 1 stalk spring onion scallion
- 2.5 cm ginger
- ⅛ tsp Chinese 5 spice powder
- 1 Tbsp light soy sauce
- ½ tsp Shaoxing rice wine OR ⅛ tsp clear vinegar
- ½ tsp toasted sesame oil
- 1 pinch salt
Simple Dumpling Sauce
- 2 Tbsp light soy sauce
- 60 ml Chingkiang black vinegar OR rice vinegar OR any clear vinegar
- 60 ml chilli oil (chilli crisp) plus some crispy bits
- optional sugar if your chilli oil is very spicy
Cooking the Dumplings
- water
- vegetable oil for potstickers and steaming
Instructions
Dumpling Wrapper Dough
- Mix the flour and salt in a large bowl.Using a wooden spoon, stir the flour in a clockwise motion as you gradually pour the water in, leaving behind about 1 Tbsp of it. Continue stirring until it all comes together.Add the rest of the water if you need it.

- Using your hands bring the dough together, kneading it in the bowl for about 1 minute. At this stage, your dough will still have a fairly rough texture. Cover with a damp tea towel and leave it to rest for 10 minutes.This initial resting allows the gluten to relax to allow you to do the actual kneading.

- Knead the dough once again for 3 minutes until it's all smooth. Now we're going to let the dough really rest for at least 30 minutes, or for however long it takes you to make the filling.

The Filling (while the dough is resting the second time)
- Grate or mince the ginger and finely chop the spring onions.Chop up the cabbage and the shiitake fairly finely too.

- Place your chicken thighs into a food chopper and pulse to get a fine mince.If you're starting with minced chicken, move on to the next step.

- Place the chicken and all the filling ingredients into a large bowl.

- Mix everything together with your hand, a pair of chopsticks or wooden spoon, in one direction for 2 minutes.You could also massage the filling by squashing it with your fingers. This works too. Just like sausage making.We are creating that gel-like texture I talked about in the article above.

Roll the Wrappers
- Divide the dough into 2. Place 1 half back in the bowl and cover.The traditional way is to create a doughnut shape with the dough, then lengthening it into a "rope". But I think a much easier way is to keep halving your dough until you have 14 roughly equal pieces.

- Dust your work surface with a little flour. Press each piece into a flat disc. Then, using a rolling pin, roll it out into a thin disc, roughly about 7.5cm/3" wide. (7.5 – 10cm or 3 – 4 inches works well). I do this using the roll, turn, roll method. See attached video. This way, the middle of the dumpling wrapper remains a little thicker then the edges, how it should be. But you do what you're comfortable with.Place the wrapper to one side, cover with a tea towel and repeat with the rest of the dough, piling your wrappers on top of each other. Dust with flour to ensure they don't stick. The flour gets absorbed after a while, so you want to work fairly quickly, before the wrappers get too dry. Don't forget the other half of the dough that's in the bowl.

- If you would rather, you could also roll out the dough thinly and cut out the wrappers using a cookie cutter or a glass.

Fill the Dumplings
- Get a wrapper and lie it in the palm of your non dominant hand. Take a teaspoon of the filling and place it in the middle of the wrapper.If this is your first time, go easy on the amount of filling for the first 2-3 dumplings. When you're comfortable, use more filling, leaving about 1cm (just under ½") clear for you to seal.

- Seal the dumplings. We're going to keep this easy, with 2 methods, see video.Method 1: Seal your dumpling by pinching the edges of the wrapper together, expelling air from the filling outwards, as you go.Once you've sealed your dumpling, you have 2 choices: leave it as it is, smooth on the edges, or push the sealed edges together, to create a fold pattern, as in the image here.Method 2: Seal the 2 edges of the wrapper in the middle. Then, push one end in to the middle, creating 2 sides. Seal these openings. Do the same on the other side. See video.Set aside, cover with a cloth and continue with the rest of the wrappers and filling.

Cook the Dumplings 1 – Boiling
- Bring a large pot of water to boil on high heat. Reduce the heat to medium-high and slowly add the dumplings to the boiling water.You can either transfer a few at a time with a ladle, or glide them off a plate or chopping board, whatever you're comfortable with. If your saucepan is not big enough, do this is 2 batches.Stir the dumplings gently to ensure they don't get stuck to the bottom of the pan.

- When the water is back to boiling, reduce the heat to medium and cook the dumplings for 2 minutes, at the end of which, they will be done.The traditional method of boiling dumplings and ensuring that they are cooked is called the diǎn shuǐ method. It basically means a little water.In the diǎn shuǐ method, when the water comes back to a boil, you add half a cup of water to the pan, cover and bring it back to a boil. Repeat this 2 more times, at the end of which the dumplings are done.It's up to you which method you want to use. They both work the same.
- When the dumplings are done, fish them out using a slotted spoon, skimmer or whatever you have in your kitchen. Give them a quick rinse, shake off excess water and serve immediately.The rinse is to get rid of any starch that might be adhering to the dumplings. I find frozen dumplings definitely need the rinse.
Cook the Dumplings 2 – Potstickers
- Heat 2 Tbsp of vegetable oil in a large frying pan over medium-high heat. Place the dumplings in the pan, flat side down, then swirl the pan to ensure that all the dumplings are touching the oil.You'll need to do this in 2 batches if making the whole recipe. Or 3, if your pan (skillet) is not very big.

- Cook for about 2 minutes, until the bottom of the dumplings are golden brown. Then pour in 60ml (¼ cup) water, cover, and leave to steam for 2-3 minutes until the water has dried out. Cook for another 30-60 seconds to crisp up.Serve immediately. If doing in batches, transfer to a plate, keep warm, and finish cooking the rest.

Cook the Dumplings 3 – Steaming
- Bring the water in your steamer to a full boil on high heat.Coat the base of your steamer basket with a little oil. Or you could place thinly sliced carrot rounds (or small pieces of lettuce) in the basket to place your dumplings on. This will stop them from sticking.You can do 2-3 tiers if you like, to steam them all together.Images soon
- Place your dumplings in the steamer basket, cover and steam for 10 minutes on medium heat.Serve immediately, straight out of the steamer basket.
Dipping Sauce – do this during the 10-minute resting time
- Mix all the ingredients together in a bowl and set aside. Making it earlier allows the flavour to mature.


Such a good recipe!! I tried making dumplings for the 1st time and everyone loved them! Thank you!!
I am so pleased to hear that, Mirabelle!
Eek, so excited to try this! I’ve been craving dumpling soup but don’t eat out anymore due to becoming more health-conscious. I didn’t realize how easy they are to make! I will be trying this out tonight. I think my husband will be happily surprised 🙂
It has been a while since I’ve made dumplings at home. Like the detailed post and the tip to allow the dumpling dough to rest twice. For veggie filling I need to add a binding ingredient like crumbled tofu or even a bit of potato. But for the non veggie filling, well explained science behind why the filling should be stirred in one direction.
Cheers Mayuri.
That is a very detail post on how to make the dumplings and the fillings Azlin. I have made them once but never attempted again. I like the idea that this can be frozen too, I would definitely give them a try again.
Thanks Renu.
Can’t tell how delighted I am to see this recipe as I was craving these dumplings so bad since the Singapore trip! And thank you so much for sharing the recipe for the wraps from the scratch because I was afraid the ready to use from market won’t turn put as good as the authentic ones.
My pleasure, Maria. Food in Singapore is just out of this world!
Very detailed post Azlin.. making dumplings had been on my to do list since a long time but I always shy away from trying these.. i have this post now.. will try soon and share my feedback
My pleasure, looking forward to your feedback.
I’ve always wanted to try making them. Thank you Lin. This looks really doable, can I make them a few hours early to take to a party?
HI Nicola, Yes, you can. Dumplings, while great while still warm/hot, are often at room temperature by the time we get around to eating them. I think up to 6 hours is perfectly fine. Keep them covered to stop them from drying out.
If you’re making potstickers, and can do so, warm them up the same way you cooked them for about 3 minutes on medium-low, with a couple of tablespoons of water.