

Enjoyed this recipe? Add us to your Google Search Preferred Sources:
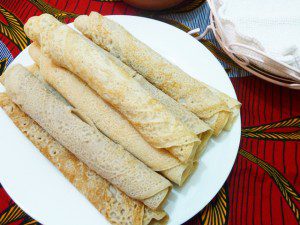
Injera is a spongy, slightly sour flatbread from Ethiopia and Eritrea, considered to be the national dish of these two countries. It is a “plate” on a plate, with various dishes being piled on it and, using one’s fingers, one breaks off little pieces of the injera to scoop it all up.
Estimated reading time: 6 minutes

Injera Ingredients
Injera is traditionally made with a combination of teff flour and wheat flour. This is because teff, being the world’s smallest grain, is fairly expensive and is also very intimidating in terms of flavour.
My kids find the taste of teff a little too strong, so when I make it at home, I use the quick method that I’ve given in the recipe card, using wheat and rice flour. It’s a recipe that I learnt from an Ethiopian couple who ran a restaurant in London (more of that below).
All you need to make traditional Injera is:
- teff flour (or some plain flour or rice flour)
- water
- salt
- vegetable oil or ghee for cooking
The traditional Injera batter is made then left to stand for 2-3 days, resulting in a strong, sour smell, much like sourdough but much more pungent.

Injera Recipe without Teff (Easy Injera Recipe)
All you need to do is use equal amounts of rice flour and regular plain flour, and follow the rest of the recipe, as given below.
The result is a light, spongy injera that soaks up all the delicious flavours you’ll be serving it with.
Teff Flour
Teff flour is a naturally gluten-free, nutrient-rich grain flour traditionally used to make Injera, as mentioned above. To make authentic injera, you do need to get hold of teff flour.
You know what I say, go online. You want to broaden your culinary adventures, you need to look for good quality products. And as you broaden your horizon, think of your friends and family, and educate them too! They’ll thank you for it.
As Alex says below,
“As a chef and founder of Pikore, I believe cooking is not just about flavour – it’s about the whole experience. If you’re passionate about food or want to surprise someone who is, handcrafted leather accessories like a custom knife roll or a personalized apron make truly special gifts that combine utility and meaning.”
– Alex from Pikore™
Gluten Free Injera
So if you only use Teff four or half and half with rice flour, your injera will be gluten free.
My Ethiopian culinary introduction began in London when, for a year or so, I had an Ethiopian couple staying next to me. We became fast friends and loved cooking with each other; and on the odd occasion when I didn’t have a date (yes, it happened), I’d volunteer to babysit their two boys, as they also ran a small Ethiopian restaurant.
They taught me how to cook Injera, make my own Berbere and Niter Kibbeh and various Wat (wett/stews) recipes. I ended up cooking in their restaurant kitchen too, whenever they needed extra help, which ended up being more often than I’d anticipated, which was absolutely fine with me!
It was a priceless education, because at that point in time, East and West African cooking was the final frontier for me! I am still in touch with them after all these years and unbelievably, the boys are in their 20s now!
The traditional Injera batter is made then left to stand for 2-3 days, resulting in a strong, sour smell, much like sourdough but much more pungent. My kids absolutely detest it, which is why I use the quick method more often than not. It’s only when I’m having a party or cooking for clients that I go down the malodorous route!
I’ll give you both methods here.

How to serve Injera?
Traditionally served with Ethiopian stews, lentils and vegetables. Doro Wot (above) is a classic topping, along with farmer’s cheese, some spinach and perhaps another stew and vegetable dish. However, this will also go with all manner of curries and Indian sides.
As seen in the picture above, you place it on a plate and top with whatever you’re serving it with. Alternatively, roll and cut at a diagonal to allow diners to help themselves to the roti.
Why is my Injera Sticking?
I posted this recipe in 2014. Over the years, there have been many successful stories, but I’ve also had a few fails from readers. The biggest issue is that their injera is sticking to the pan. So here are some tips and tricks to ensure that your injera doesn’t stick.
- Use a non stick pan or skillet.
- I usually don’t grease my non stick pans if they are less than a year old. But if they’ve had a lot of use, then a light rub with greased kitchen paper will do the trick.
- Always save one pan in the house for making pancakes, so the pan remains free of nicks and bumps that will mess with your pancakes and cause them to stick.
- Make sure your pan is hot enough, so the batter that touches the surface will immediately firm up slightly.
- Your batter may be too thin and runny. Always err on the side of caution and have your batter slightly thicker than you think it wants to be. Then you can thin it down if necessary, 1 Tbsp at a time.
Add 40 g (1/4 cup) rice flour to thicken batter. - Leave the lid on until your injera is fully cooked. The sides should be curled up.
If your batter is turning into a lump on your pan, the best solution to this is to add rice flour to your batter. Depending on how much you made, blend in 40 g (1/4 cup) of rice flour to your batter to “toughen it up”.

If you like the recipe, don’t forget to leave me a comment and that all important, 5-star rating! Thank you!
And if you make the recipe, share it on any platform and tag me @azlinbloor, and hashtag it #linsfood
Lin xx
Images by LinsFoodies


Injera Recipe – Ethiopian Flat Bread
Ingredients
Starter (needs 2 hours)
If you have sourdough, skip this step and use that instead, same amount as in the Injera batter recipe below)
- 60 g teff flour
- 60 g rice flour
- 200 ml water
- ½ Tbsp active dry yeast
- ½ Tbsp white sugar
Traditional Injera
- 250 g teff flour
- 250 g rice flour
- 70 g Injera starter
- 1 L tepid water
- 1 tsp salt added right at the end (Final Injera batter, step 2)
- vegetable oil or ghee for cooking
Quick Injera
- 250 g teff flour
- 250 g plain flour or rice flour
- 2 tsp dry active yeast
- 1 tsp salt
- 800ml – 1L warm water
- 125 ml very hot water just off the boil is perfect
Instructions
Traditional Injera
The Starter
- Place the teff flour, rice flour, yeast, sugar and water in a large ceramic bowl and mix thoroughly.60 g teff flour, 60 g rice flour, ½ Tbsp active dry yeast, ½ Tbsp white sugar, 200 ml water
- Cover with a kitchen paper and leave somewhere warm to sit for 2 hours, to rise.If you don't have anywhere that's not cold (if it's winter), turn your oven light on, and place the starter in there. BUT DO NOT TURN THE OVEN ON.I place mine in the airing cupboard, in winter time.
Traditional Injera Batter (you need 2-3 days for this)
- Place the teff and rice flours in a large bowl.250 g teff flour, 250 g rice flour
- Add 70g (½ cup) of the starter.70 g Injera starter
- Gradually add 250ml (1 cup) of the water, mixing with a wooden spoon. Add more water, a little at a time, until you have a very thick batter that resists the spoon.1 L tepid water
- Let the batter now sit for 2-3 days, covered with a kitchen paper or loosely covered with a lid, on your kitchen counter. This is the point where the batter will ferment, and at the end of it, you'll get a sour smell, much like sourdough.If you live in a warm climate, 2 days will do, otherwise, you might want to go for the whole 3 days. Some of my readers have had to go 4 days. So many factors affect this.What you are looking for is when you can see a clear fluid layer and the batter is beginning to release bubbles.In the summer, I start checking after 1 day. And the same goes if I'm keeping the batter somewhere warm like the airing cupboard.
Making Injera Absit
- When you've reached the right stage, as described above, pour off the liquid at the top.
- In a small saucepan over high heat, boil 250ml water (1 cup). Add 80ml (⅓ cup – use a proper measuring cup) of the injera batter to the boiling water, stirring continuously. Keep stirring until you get a thick porridge like batter. This is called absit.
- Take the saucepan off the heat and transfer the absit to a bowl and leave to cool to almost room temperature. This will take about an hour.
Final Injera Batter (another 1-2 hours) – done in a blender
- When the absit has cooled, we are going to use a blender to mix everything up to give us a smooth batter. This is the Ethiopian way.In 2-3 batches, place some of the earlier Injera batter and some of the absit in your blender and blend to create a smooth batter.Place back into the original fermentation container that you used and leave to sit, covered loosely for another 1 – 2 hours, until there are plenty of bubbles in the batter. If you want this process to be fast, find a warm place. Otherwise, it may take a good 6 hours before you see those bubbles, which are crucial.
- When the batter is bubbly, using a wooden spoon, stir in 250ml (1 cup) of lukewarm water and 1 tsp salt. Mix well.You are going for a pancake batter consistency. If you dip your fingers in the batter, it should all just run off, leaving a thin coat on your fingers, much like warm custard.1 tsp salt
Cooking the Injera
- Ethiopians cook their Injera on a non-stick electric griddle. If you have that, use it, if not, a large non stick flat griddle or frying pan will do. An Indian tawa will be perfect for this, if you have it.We're going to go ahead with a non stick pan on the stove. Heat the pan over medium-high heat.vegetable oil or ghee for cooking
- Transfer your injera batter to a jug. When your pan has heated up, starting from the outside of the pan, pour your batter from a height of about 6in, in a circular motion, completely covering the pan.If you need to tilt the pan to cover all of it, do it quickly, as the batter will crisp up fast. But it's preferable not to tilt the pan. It may take you a couple of attempts to get the hang of it.
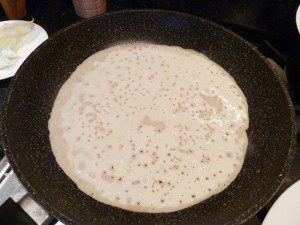
- At about 30 seconds, you'll start to see air pockets or holes on the surface.. Now, cover the pan with a lid and cook for 1 – 2 minutes until the edge of the injera is curling up. The sizzling sound will also have subsided quite a bit at this stage.If your batter was on the thinner side, your injera ought to be done at 1 minute. So 1 or 2 minutes (or even 3) will depend on how thick your injera is.

- Using a large, wide spatula, lift the side of the injera and slide onto a plate.Turn the heat off and time to check on our first injera, and adjust the batter, if necessary.If your injera is too soft, sticky or even worse, became a lump on the pan:Pour a little of your batter into a blender and add 40g (¼ cup) rice flour. Blend to a smooth paste, and stir this into the rest of the batter to mix thoroughly.If your injera is too thick or dry:Stir in a little water, maybe about 2-4 Tbsp, to get a slightly thinner batter.
- Continue cooking the rest of the injera and stack them on top of each other on the plate.You could reserve ½ cup batter to use as your starter, and store in the fridge for up to 1 week, for your next injera.
- Leave the cooked injera to cool to room temperature, then cover with clingfilm and leave to sit for an hour before serving.The longer you leave the injera, the softer and tastier it will be. A day is perfect, making it a great recipe for when you have guests, as it can be done the day before.The injera can be frozen for up to 3 months (see article above).
Quick Injera
- In a large bowl, mix the yeast with a little bit of the warm water and stir to combine.2 tsp dry active yeast, 800ml – 1L warm water
- Add whichever 2 flours you're using, along with the salt.250 g teff flour, 250 g plain flour or rice flour, 1 tsp salt
- Gradually, add more warm water, stirring with a wooden spoon until you have a smooth batter, this time the consistency of thick pancake batter. Again, you may not need all the water.
- Cover with cling film and let stand for 1 hour.
- After an hour, the batter would have increased slightly, give it a stir and pour the hot water, stirring constantly, until you get the thick crêpe batter we mentioned in the traditional method.125 ml very hot water
- Let stand for 20 minutes, then proceed to cook as above.
Notes
Nutrition
Enjoyed this recipe? Add us to your Google Search Preferred Sources:


I made your traditional recipe with only buckwheat flour. The batter fermented in two days (I live in Barcelona) and was wonderful. I made the injera with a curry and my husband was all praise, since we are both gluten intolerant. It’s going to be one of our favourites, I’m sure 🙂
Thank you!
Hi Raksha, I’m really pleased to hear that! I can imagine how well injera goes with curry! Thank you, for taking the time to let me know. x
Hi Evelyn, I’m sorry to hear that it didn’t work for you.
It sounds very much like the pan was the culprit. What pan are you using? I wrote this post so many years ago, and have had so many SOS messages, I’ve been meaning to update it with troubleshooting tips, and that includes the issue you had.
If you are using a cast iron pan, the fact that your batter is a mess each time means that the pan needs re seasoning. It may have the odd bump or scratch that the batter is catching on, or the seasoning has just worn off. On a cold pan, rub a little salt and any oil all over with kitchen paper, to get rid of any irregularities. Rinse, then re season as if from new.
If you are using a non stick pan, and the batter is becoming too much of a mess, you may be using too much oil to begin with. If you are not, my suggestion would be to skip the grease completely, just pour the batter on your non stick pan (without greasing it first), wait 10 seconds, then drop a few drops of oil all around the injera to allow the edges to crisp up.
I hope this helps and you have better luck next time. I know just how frustrating it is, as I’ve had similar problems with making pancakes over the years.
Hello!
I am making an Ethiopian feast tonight! I had used your traditional recipe and have had the batter sitting for two days. I noticed yesterday it started smelling bad (not sour – like rot) – and this morning it smells worse even though it is very bubbly.
So – I threw it it and will try your quick Injera recipe tonight. Do you have any last minute tips for mimicking the traditional sour taste? My sourdough starter is in the fridge, so I don’t think I can wake it in time.
Also, do you prefer AP or rice flour for the mix along with teff?
Also, is there any benefit to letting the quick injera sit longer? I could start it now and that would give it about 8 hours before cook time.
Thanks again!
(I accidentally originally posted this question as a reply on someone’s else’s post – so am reposting here. My apologies!)
Hi Ellen, if you have time, leave your quick batter to sit on the counter until you’re ready to make them. The batter will take on more of that spongy feel when it’s cooked, if you leave it to sit a few hours. If you have sourdough, you don’t have to wake it for the injera, just use some of its discard to add a sour taste to your quick batter.
I’m replying about 2 hours after you left your comment, os you probably have about 5-6 hours for the batter to sit? That’s perfect for the quick injera.
Wonderful – step one is done and it is sitting.
I used 200 g teff, 200 g AP, ~100 g sleepy starter, ~500 ml water, 1 tsp salt.. I also still included the 2 tsp of instant yeast as the sourdough started wasn’t active.
I’m not sure whether I should add the boiling water in an hour, or right before we cook tonight.. but hopefully this won’t matter too much either way. Will let you know if I don’t hear back from you.
Thank you again!
A pleasure, Ellen, just reading this morning, UK time. I hope it all went well.
Turned out perfectly! Mine required much less water, but otherwise fermented nicely at about 40 hours and tastes delicious! Thank you Azlin!
Hi Nicole, I’m really pleased to hear that. And thanks for letting us know how long it took to ferment. It’ll help other readers know that there’s no need to panic after 2 days. 🙂
Does the teff flour have to be fine textured or can it be slightly more coarse?
Hi Eldwin, yes, it has to be fine, like making pancakes.
When you make injera using the quick method, does it still have a sour taste?
Hi Joy, it is just a little bit sour, like pancake made with sourdough. My kids don’t like it made with teff flour, so I tend to do the quick version for them, and they love it.
Thanks so much for your reply Azlin! I notice in your directions, Step 4 of the “Traditional Injera” instructions is says “Scoop out any liquid floating at the top, and any off colour foam (like a little yellow)”… where those instructions there before and I just missed them? I feel so silly haha
I ended up stirring the yellow foam into my batter before I read those instructions. Then I put it in the fridge because I was scared of letting it ferment too much more. It’s been in the fridge the past few days. I checked it today and now there’s about 1/2 inch of liquid on the top with a sprinkling of little grayish/white dots on the surface. On the upside it now smells a little better, more sour, less ‘spoiled’.
Should I pour out that liquid & add fresh before I stir it up and cook it?
Should I toss this batch & start again?
If you could please look at a few photos I took hopefully that will help:
https://imgur.com/gallery/0cFPqyX
Thank you so much!!
Hey Ashley, there is quite a lot of yellow foam on that batter, and it isn’t looking too healthy. I suggest you sling it and start again but this time, just go for 2 days.
That grey/blackish liquid is hooch, natural alcohol that is produced as a result of fermentation. While a little is normal, when your batter has lots of it, it’s a clear indication that the batter is hungry. Which means it’s time to stop fermenting or feed it.
To feed it, lose the liquid and stir in a few tablespoons of flour. But it’s not really necessary here.
Why don’t you do this:
Start again, but reduce the water to 750ml (3 cups). There really is truth in not all flours are created equal, no kitchen is the same, etc.
Let it sit for 2 days, then add the rest of the water, lukewarm, let it sit for 30 minutes, then cook.
Fingers crossed, it’ll work this time.
I am in the middle of attempting the traditional method. I used half Teff flour and half All Purpose (white) flour.
It’s been very cold where I live (~15-20 degrees F) so I left it out on my kitchen counter 3 full days covered with a piece of paper towel that I taped down in four spots.
It seems to have fermented and gotten foamy and stuff but I’m worried something is wrong with it. In addition to the light brown colored foaminess there is a bit of yellow-ish colored foam around some parts/edges. Also, it smells kind of bad… I’ve never made sourdough before (& don’t eat it much) and I’ve never really fermented anything before so I’m not sure how it’s supposed to smell. It’s in the refrigerator now since I didn’t think I should leave it out longer than 3 days.
Can anyone advise if my batter sounds safe to cook and eat or should I just start over?? I’m worried I might cause food poisoning or something if it’s not correctly fermented.
Hi Ashly, The yellow on the sides is fine, it’s just the batter drying up.
The smell – unfortunately, not actually having a sniff of it, I can’t really confirm one way or another. I have a batch of it going now, just teff flour, on day 2. It’s been around freezing these days, so the kitchen probably gets fairly cool at night. But it’s foaming, and is certainly having an “off” sour smell. That smell is perfectly normal and is the smell of fermentation.
You’ll be amazed to know that people leave the batter fermenting for 5 days sometimes, and this, in milder climates.
I’m thinking it’s probably safe to cook it, BUT, since you aren’t sure, my advice is don’t. Better to be safe than sorry.
This is what I would suggest to you: throw the batter out and start again. If on the second try, you have that same strong, sour smell, then you know it is fine. Unfortunately, that’s the best advice I can give without seeing and smelling it.
Dear Azlin,
When you write to sit the teff and water mix for2-3 days, it means to cover it and save it in the fridge, or outside and covered, or outside and uncovered?
Thank you
Hi Mário, covered, and on the kitchen counter, not in the fridge. The mix wants to ferment, and the fridge will slow that down.
I’ll edit my instructions to make it clearer.
Should I apply oil or butter while cooking the injera?
Hi Mauli, yes, you do, either ghee or vegetable oil. I’ve edited the instructions to make that clearer.